HUGO で Amazon アソシエイトの画像リンクを作成する
HUGO で Amazon アソシエイトの画像リンクを作成する
July 19, 2024
出力例
事前準備
- Amazon の アソシエイト ID
やり方
- Amazon アソシエイト Shortcode を作る
- config.toml に amazonJpAffiliate の ID を追加する
- 記事に Shortcode を記載する
1. Amazon アソシエイト Shortcode を作る
保存場所: layouts/shortcodes/product_card_amazon.html
{{- $tag := .Site.Params.amazonJpAffiliate }}
{{- $product_id := .Get "asin" -}}
{{- $product_image := .Get "image" -}}
{{- $product_title := .Get "title" -}}

<style type="text/css">
        .amazon-widget {
            display: flex;
            align-items: center;
            justify-content: space-between; /* 子要素を左右に配置 */
            border: 1px solid #ccc;
            padding: 20px;
            border-radius: 10px;
            max-width: 600px;
            margin: 20px auto;
            box-shadow: 0 0 10px rgba(0,0,0,0.1);
            text-decoration: none;
            color: inherit;
        }
        .amazon-widget a {
            align-items: center;
            text-decoration: none;
            width: 80%;
        }
        .amazon-widget-img {
            flex: 0 0 auto;
            margin-right: 20px;
        }
        .amazon-widget-img img {
            max-width: 150px;
            max-height: 150px;
            border-radius: 10px;
        }
        .amazon-widget-info {
            flex: 1;
            display: flex;
            flex-direction: column;
            justify-content: center; /* 子要素を縦の中央に配置 */
        }
        .amazon-widget-title {
            font-size: 16px;
            font-weight: bold;
            margin: 0 0 10px 0;
            display: block;
            text-align: center; /* テキストを中央揃え */
        }
        .amazon-widget-synopsis {
            font-size: 14px;
            margin: 0 0 10px 0;
            display: block;
            text-align: center; /* テキストを中央揃え */
        }
        .amazon-button {
            display: inline-block;
            padding: 10px 20px;
            background-color: #ff9900;
            color: white;
            text-align: center;
            border-radius: 5px;
            text-decoration: none;
            font-weight: bold;
            cursor: pointer;
            margin-top: 10px;
            align-self: center; /* ボタンを中央に配置 */
        }
        .amazon-button:hover {
            background-color: #e68a00;
        }
</style>
<div class="amazon-widget">
    <div class="amazon-widget-img">
        <img src="https://m.media-amazon.com/images/I/{{ $product_image }}._AC_SX522_.jpg" />
    </div>
    <div class="amazon-widget-info">
        <span class="amazon-widget-title">
            {{ $product_title }}
        </span>
        <a href="https://www.amazon.co.jp/gp/product/{{ $product_id }}/?tag={{ $tag }}" class="amazon-button">Amazonで購入</a>
    </div>
</div>
2. config.toml に amazonJpAffiliate の ID を追加する
編集場所: config.toml
[params]
    amazonJpAffiliate = "Your Affiliate ID"
3. 記事に Shortcode を記載する
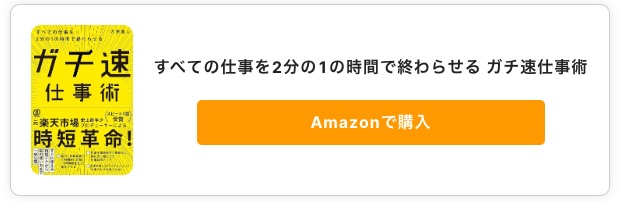
{{< product_card_amazon asin="4844339648" title="(PDF版付)徹底攻略LPIC Level1問題集[Version 4.0]対応" image="91+IeF0u9eL" >}}実際の出力例

ラクに商品ページの Shortcode を作成するツール
使い方
- ブラウザのお気に入りに下記コードを登録(名前はなんでも良い)
- Amazon の商品ページを開く
- 登録したお気に入り(下記コード)を実行すると、ブログ記事に貼る用の Shortcode が生成される
javascript:(function(){try{var title=document.getElementById("productTitle").textContent.trim();var asin=document.URL.match("(dp|product)/([0-9a-zA-Z]{10})")[2];var imageURL=document.querySelector("#landingImage, #imgTagWrapperId img").src;var image=imageURL.match(/images\/I\/([0-9A-Za-z+]+)\./)[1];var markdownText=%60{{< product_card_amazon asin="${asin}" title="${title}" image="${image}" >}}%60;function copyToClipboard(text){var textarea=document.createElement("textarea");textarea.value=text;document.body.appendChild(textarea);textarea.select();document.execCommand("copy");document.body.removeChild(textarea);}copyToClipboard(markdownText);window.alert("Markdown形式のテキストがクリップボードにコピーされました:\n"+markdownText);}catch(e){window.alert("エラーが発生しました: "+e.message);}})();